

One of the challenging aspects of web scraping is coming up with robust CSS selectors that extract the correct elements across paginated series or even consecutive runs.
The site’s layout might change over time which will result in empty data when you rerun your scraper.
In this article, I will cover the basics of CSS selectors, and present some best practices when it comes to coming up with robust selectors so you can consistently get valuable data.
These practices are based on what I learned by taking up side gigs on web scraping, as well as by building a no-code web scraping tool. For the tool, I developed a quite complex algorithm to generate selectors that include the elements you selected and similar ones as well. Sometimes, though, you might still need to tweak it.
Whether you rely on no-code tools, or you develop your own scripts, this article will arm you with the knowledge to do that.
Identifying elements on a web page
To scrape web data, we first need to identify the elements holding it. There are two main ways to do it: XPath and CSS selectors.
XPath
XPath stands for XML Path Language. It is also used for locating elements of a web page. An example of an XPath expression:
/html/body/div[1]/div[3]/div/div/div[1]/div/div/div[1]/h1
CSS selectors
CSS stands for Cascading Style Sheets. It’s a technology used for styling HTML elements. It uses selectors for identifying elements, and rule blocks to apply styles to them. For our purpose, we’re only interested in the selectors part. An example of such a selector is:
body > #productsList > li.product
This selector points to all list item (<li>) elements that have the class product and are direct descendants of an element with the ID productList, which is, in turn, the direct descendant of the <body> tag. I’ll cover this syntax in detail shortly.
CSS selectors are preferable to XPath for a couple of reasons:
- they are parsed faster by the browser (performance advantage)
- they are more robust and are easier to learn and maintain
Because of this, we’ll focus on CSS selectors in this article.
CSS selector basics
So let’s cover the basic syntax of CSS selectors, what each is ideal for, and ways of grouping & combining them.
The tag selector
Example: div
The basic way to target elements is by their tag names (div, span, p, etc.). The example above selects all <div> elements.
While it can be sufficient on some simple pages, you’ll most likely have to couple them with descendant selectors or combine them (I cover how in a moment).
The id selector
Example: #id
Elements on a web page should have unique IDs, so no two or more elements should share the same ID. Therefore, to reliably select a particular element, you can target its ID (if it has one) with the “#” operator.
This is useful if you’re scraping the detail page of a product, for instance, which contains multiple pieces of unique information about it.
But be sure to check if the respective information has the same ID on all detail pages. Otherwise, you’ll get empty datasets.
The class selector
Example: .class
Classes identify elements that are semantically or stylistically similar. Contrary to IDs, multiple elements can share the same class and one element can have multiple classes, e.g. .class1.class2 (note the lack of space between the two classes)
They are ideal to target when scraping listings because elements in the same column often share the same class(es).
The attribute selector
Examples: [attr], [attr=”value”]
Elements can have custom attributes. Not all of them are useful for targeting but let me present a few that are.
The rel attribute defines the relationship between the linked resource and the current document. For example, the link to the next page in a pagination series can often be targeted as:
a[rel="next"]
HTML5 introduced data-* attributes that allow storing custom information with an element. Targeting them often pays off, even if they hold unique IDs.
Consider three elements that have a data-item-type attribute with “product” as value. Since they share a common value, you can target them with:
[data-item-type="product"]
Now consider three elements that have a data-item-id attribute with different values for each. In this case, you can target all of them with:
[data-item-id]
This simply selects all elements that have this attribute (irrespective of the value).
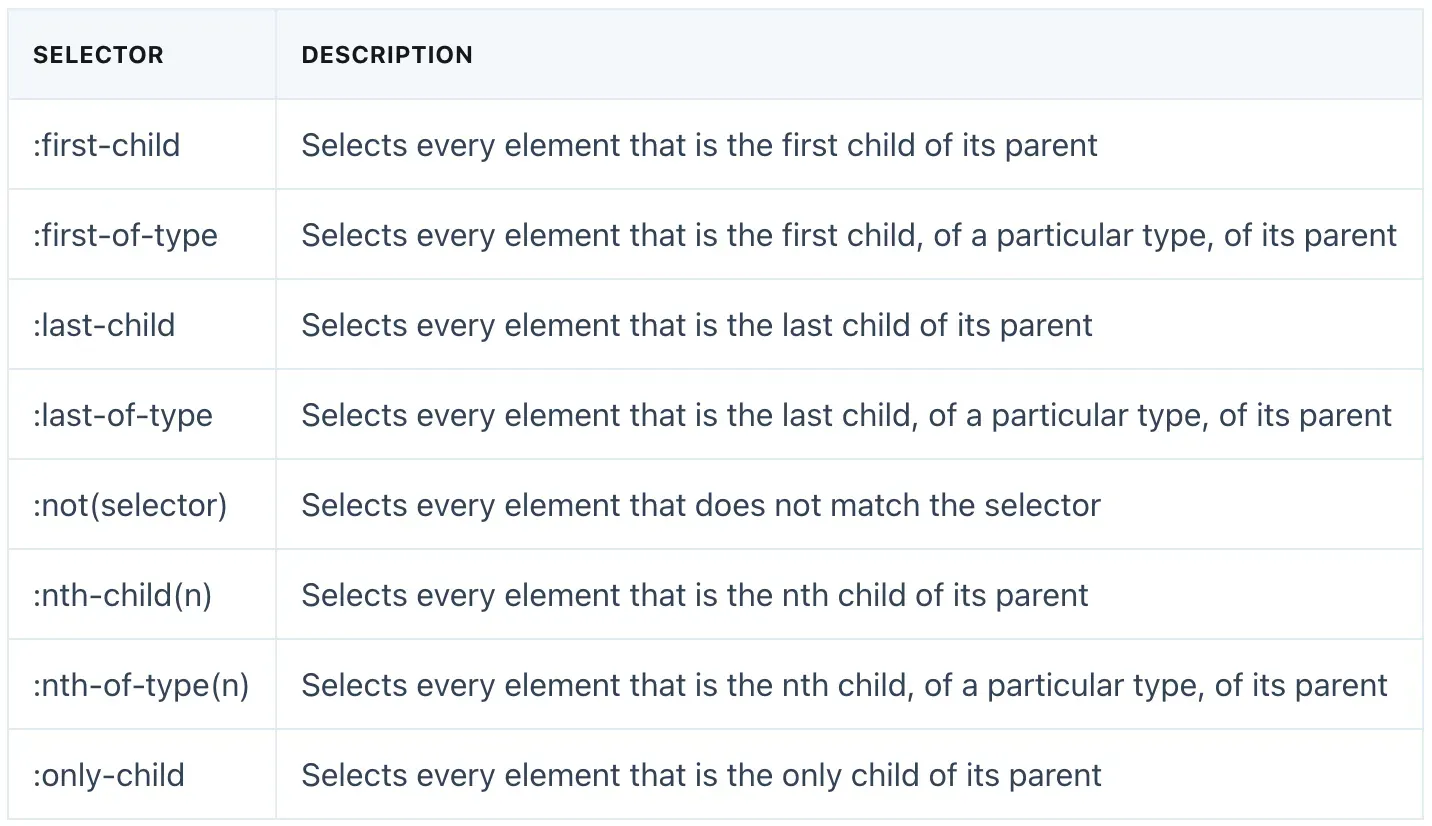
The pseudo-class selector
Example: :nth-of-type(2)
They are special keywords prefixed with “:” and are used to define special states of elements. Not all of them are useful for web scraping, but let me list a few that are:
Combining and grouping selectors
We covered the simple selectors above. However, you’ll most likely need to combine them in some way to target the desired elements. Let’s see a few ways to do that.
Selector concatenation
In order to use multiple selectors to identify elements, you can concatenate them. For example:
div#id1.class1.class2[data-role="item"]
This selector matches all div elements with the ID id1 (technically at most one) with both class1 and class2 classes present, and with a data-role attribute having “item” as value. So ALL of these conditions have to be met for the element to qualify.
Selector list
Example: div, span
With the comma (“,”) operator, you can target elements matching either selector (or both). The example above selects all <div> and <span> elements.
This selector is useful when you’re trying to scrape a list that has alternative element types. For example, when scraping a list of authors, some of the elements may be links to the profile pages, while others might only be <span> tags.
It’s important to note that, if the elements matching the two selectors overlap, they won’t be de-duplicated. So it’s not like the union of two sets. Therefore, be sure to choose non-overlapping selectors.
Combinators
Selectors can also be combined in several ways to increase specificity so that only the appropriate elements are selected.
The descendant combinator
Example: div span
The “ “ (space) combinator targets elements that are descendants of the first element. The example above will target all <span> elements that are descendants (direct or indirect) of <div> elements.
The child combinator
Example: div > span
The “>” combinator targets elements that are direct descendants (children) of the first element. The example above will target all <span> elements that have <div> elements as their parent.
The general sibling combinator
Example: div ~ span
Here the “~” combinator targets all span elements that follow a div element (though not necessarily immediately).
The adjacent sibling combinator
Example: div + span
In this example, the “+” combinator targets all span elements that immediately follow a div element.
How to come up with robust selectors
As mentioned above, when we try to come up with robust selectors, we face a couple of challenges. We need to make sure that the same selector returns the correct element across all pages in a paginated series.
Also, if we’re scraping the same site regularly, we need to account for site changes and come up with selectors that will likely hold the same data across site revisions.
Note that there is no silver bullet here. Developers might change the site’s layout in such a way that our configuration breaks inevitably. Still, there are a few good practices that we can apply to minimize the chance of empty data.
Minimize selector specificity
In general, you should strive for minimizing the specificity of CSS selectors, making them as flexible as possible.
For example, if the following two selectors result in the same elements:
body > #wrapper > .list > li.item
.list > li.item
… then you should go with the second one so that if the layout changes (e.g. the list is moved somewhere else), it’ll still target the same elements. Be sure to verify it, of course.
Don’t target random-generated or utility classes
When scraping websites, you might come across weird class names like this:
.css-cqm9yv
Names like this indicate that the site uses styling libraries like Emotion or styled-components. They allow developers to style their components using Javascript code (a technique called CSS-in-JS) and they randomly generate unique class names for each component to avoid styling collisions with others.
The problem with them is that they will be regenerated every time the site is revised and a new build is published, breaking your current configuration. So if you scrape the site regularly, you might want to avoid relying on these classes.
There is one more category of classes that makes web scraping challenging: utility classes. For example, such a class sequence in TailwindCSS would look like this:
.flex.items-center.px-4.py-3
Each of these classes sets a certain style (display, alignment, padding, etc.) of the element and when combined, they allow fast styling.
The problem with utility classes is that a certain class (e.g. “.flex”) will most likely be used on many unrelated elements. And they will also likely change if the developers revise the site’s layout or any other design element.
Therefore, rely on them with caution and make sure the class (or the combination of classes) that you target correctly identify the desired elements and nothing else.
Account for missing elements when scraping tables
When scraping tables, you might be inclined to target each column as a list of elements, then just unite them to get the table. If every list is guaranteed to always have the same number of elements, this approach is good.
Often, however, some elements might be missing, causing your data cells to be misaligned. And wrong data is worse than empty data.
In this case, target the container elements first. These would be the table’s rows. These are often product cards, actual HTML table rows, etc.
Then, target the columns relative to the row elements. This way, if an element is missing from one of the rows, the rest of the data is still properly aligned.
Using DevTools to find and debug selectors
Finally, let’s put what we learned into practice. We’ll use Chrome DevTools for it, but all modern browsers offer a similar tool.
I’ll go over the process I follow to find CSS selectors and make sure they match the correct elements.
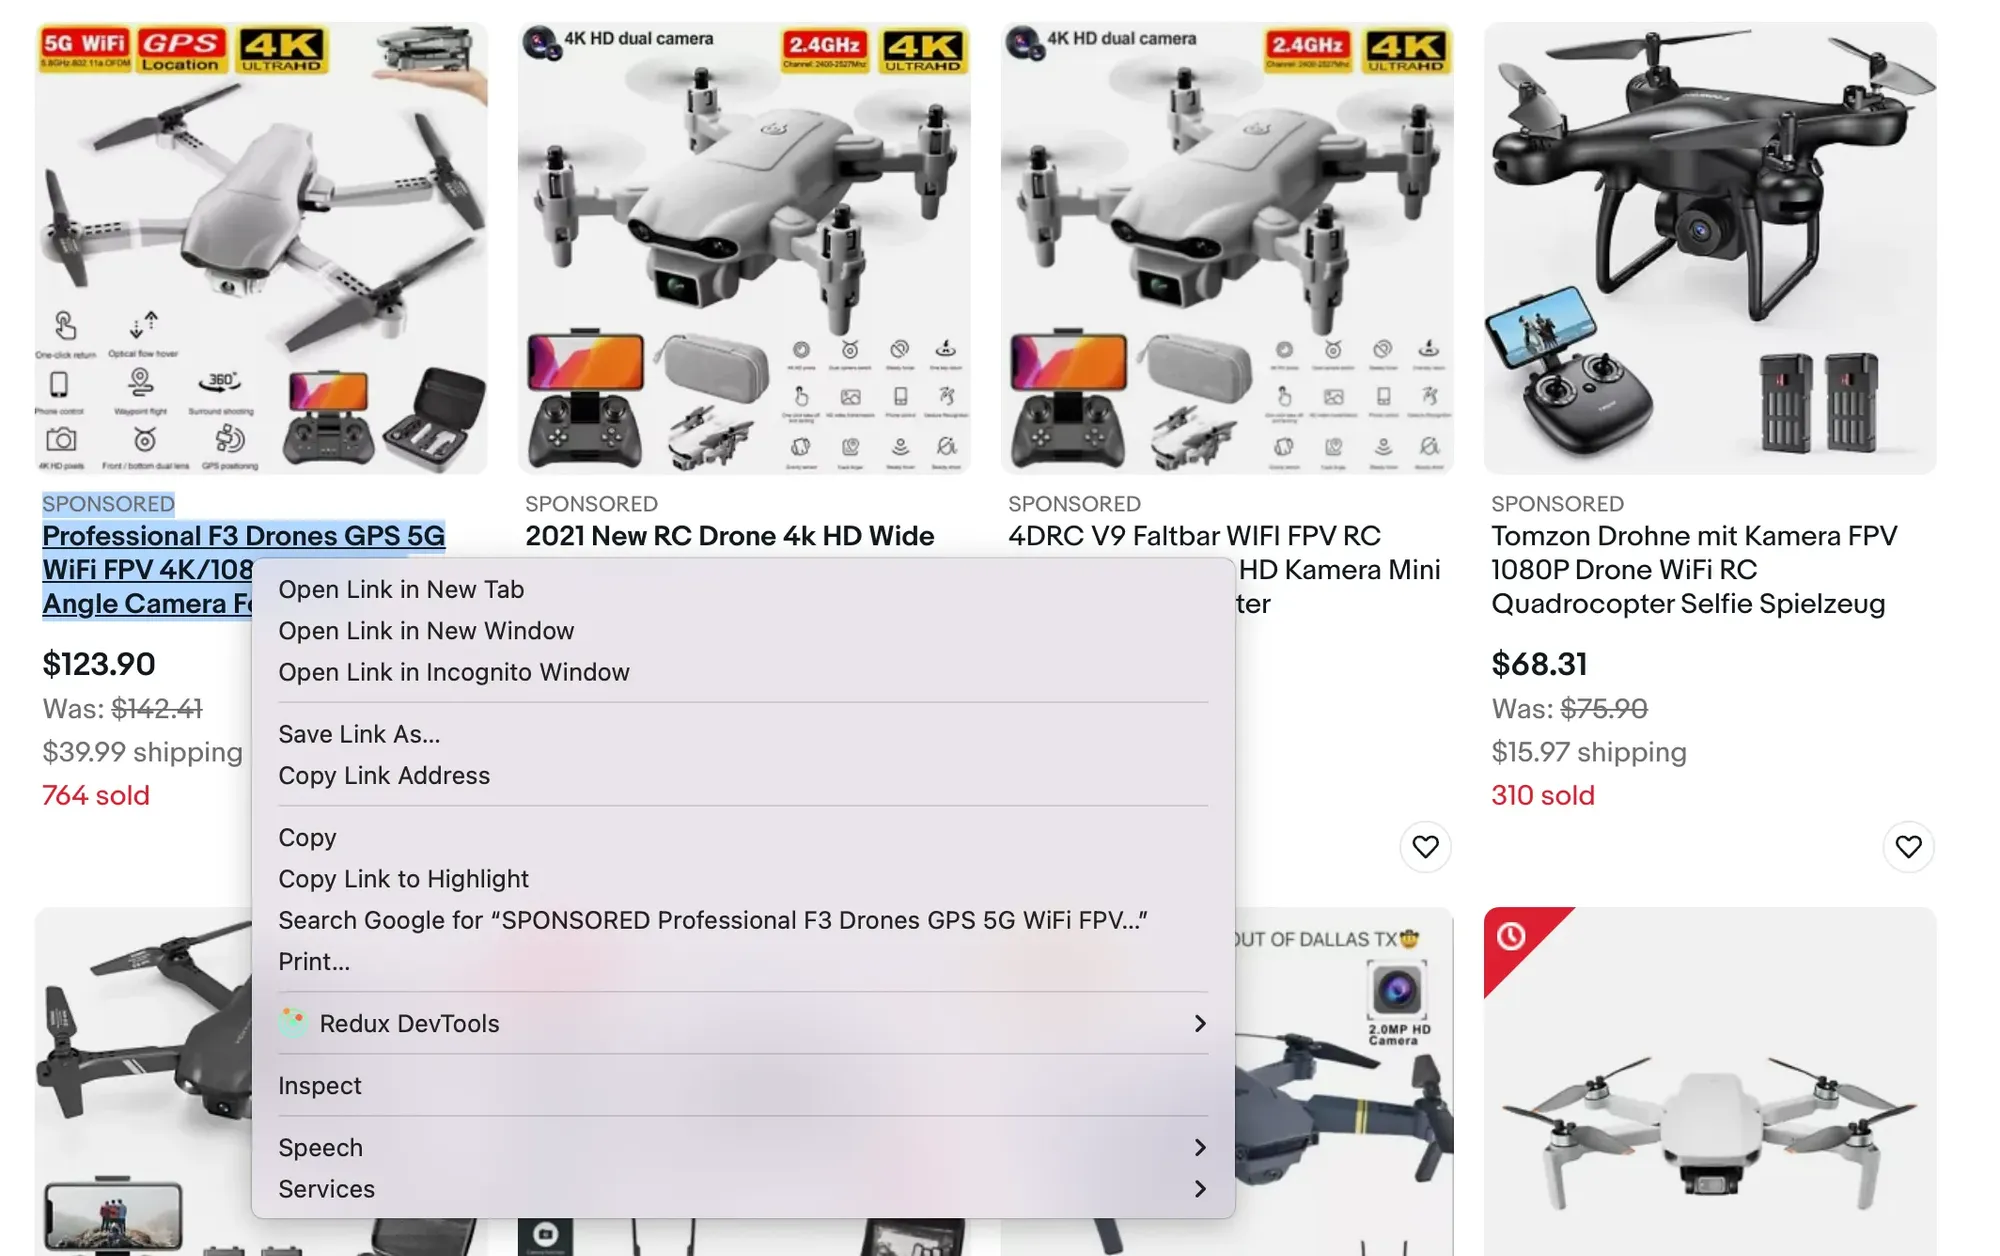
For our example, let’s look at the list of camera drones sold on eBay. Our objective is to build a CSS selector that covers the name of each product item.
Step 1: Load the site and open Chrome DevTools
So open the site, find the name of the first product (which is a link), right-click it, and choose Inspect:
This will open the DevTools and highlight the selected element on the Elements tab:
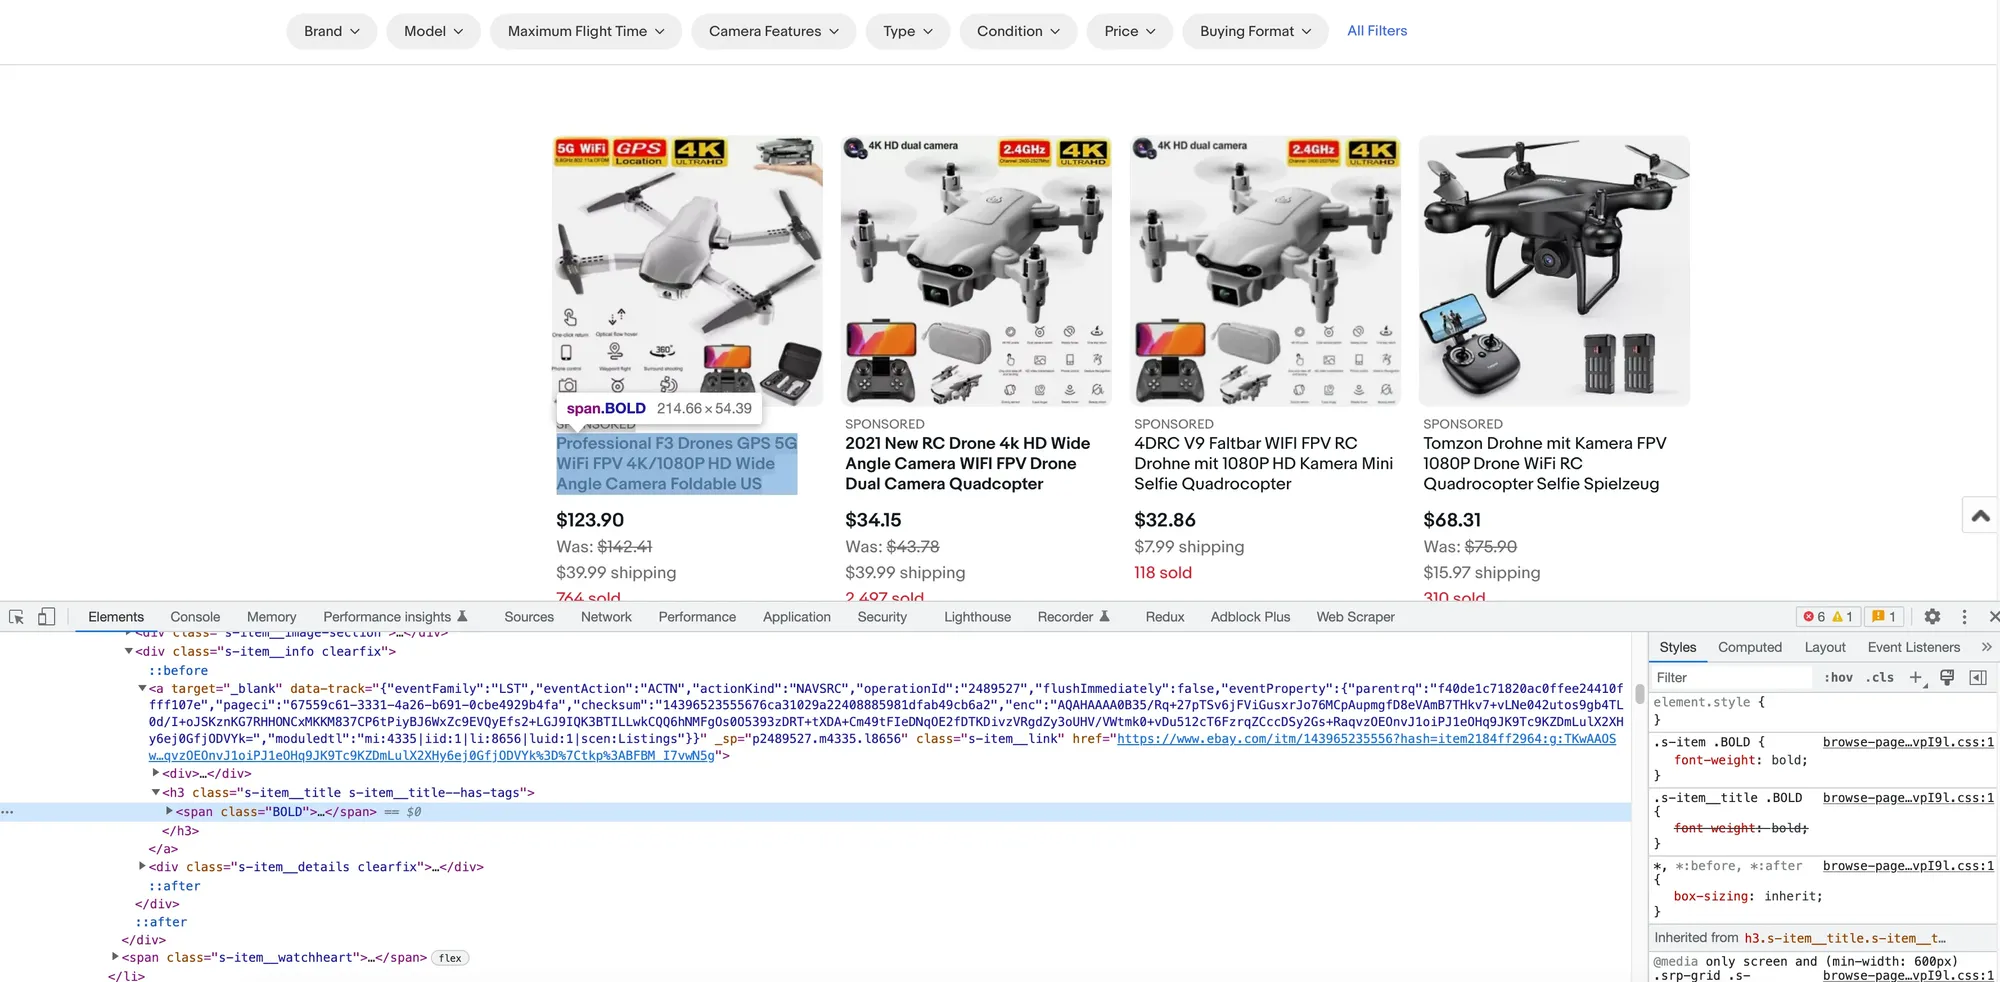
We can see that a <span> tag with the class BOLD was selected. Let’s see if this will cut it.
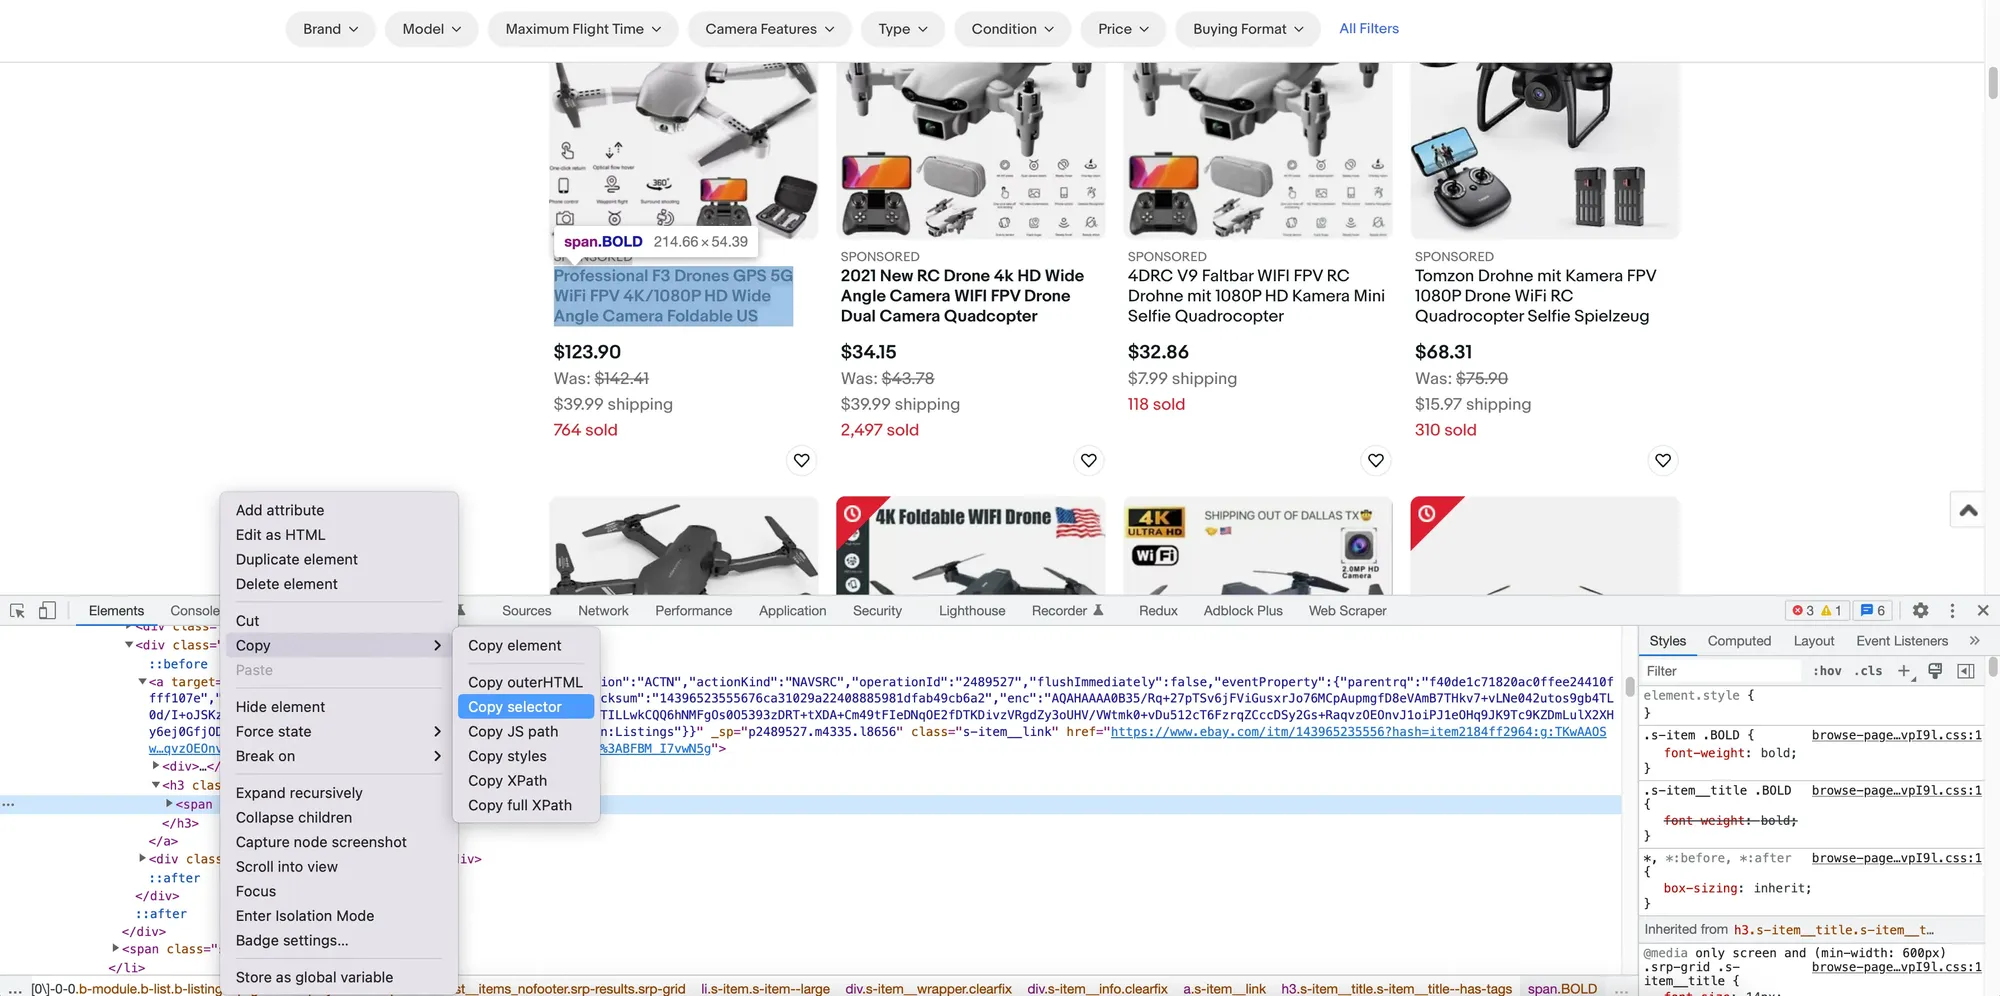
You can also get the selector generated by Chrome by right-clicking the <span> element in the DOM tree, then choosing Copy -> Copy selector:
Step 2: Evaluate the class
To check whether this class is good enough (looks a bit utility-ish, to be honest :) ), I always use the Console to find matches.
The Console is basically a command interpreter. It allows you to evaluate expressions on the current page, and even define variables and functions.
So open the Console tab, clear it by clicking the ∅ button, introduce the following code, and press Enter:
$$('.BOLD')
The $$(selector) method returns an array of elements that match the given selector. Be sure to check out the documentation for more details.
The interface might look like this:
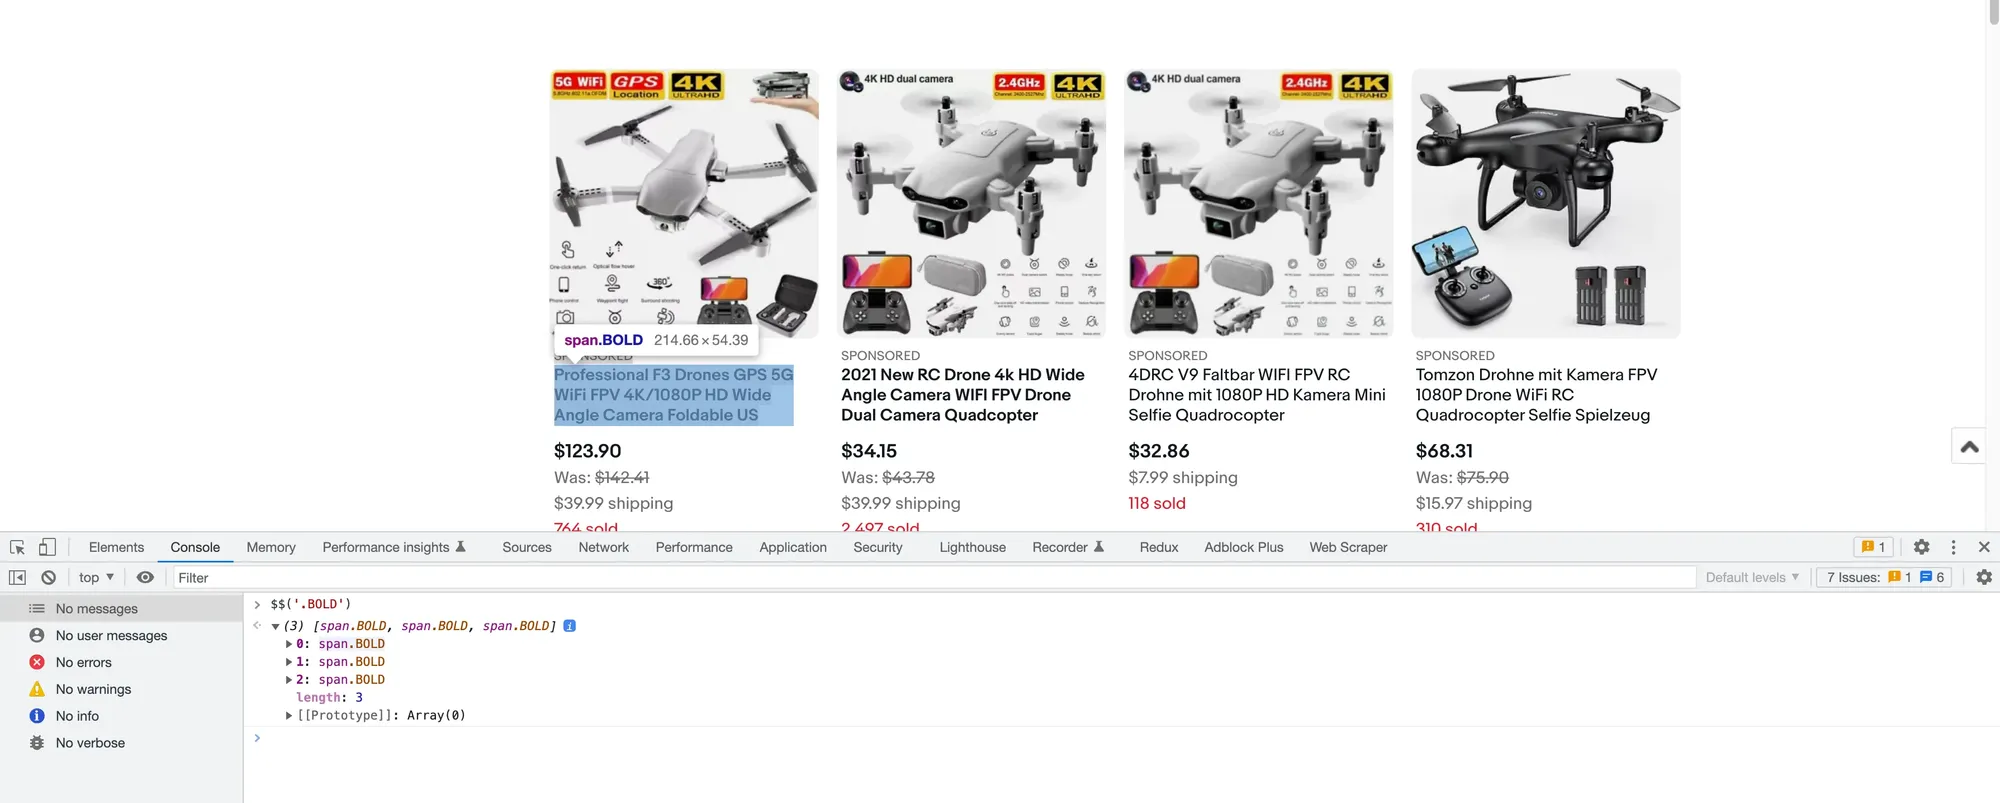
We see that the BOLD class only matches 3 elements, even though there are a lot more products listed on the page. I guess eBay considers them featured products.
Step 3: Choose another selector
All right, let’s go back to the Elements tab and try again. You can actually click on either of the 3 array elements, and you’ll be redirected to the Elements tab with the item highlighted.
We can see that it has a parent <h3> tag with several classes. Let’s start with the first: s-item__title (hmm, “item title” looks more like a semantic name, unlike “bold”).
Step 4: Evaluate the new selector
You know the drill: go to the Console tab, and evaluate the following code:
$$('.s-item__title')
You’ll find that the selector matches the names of all 47 items this time. Expand the array, hover on a few elements, and check the page to see if the correct elements are highlighted.
With experience, you’ll get a feel for good selectors that would likely match the desired elements, so this process will go faster.
(Bonus) Step 5: Temporarily restyle the matching elements
A neat little trick I like to do is to apply some contrasting styles to these matching elements to highlight them. This way, you won’t need to hover over all of them.
As an example, use this code in the Console to set a blue background for them:
$$('.s-item__title').forEach(item => item.style.background = 'blue')
Now you can scroll around and glance over them faster. To revert the styling, just refresh the page.
Conclusion
And there you have it!
We covered the basics of CSS selectors and learned some good practices for building robust selectors.
We also put these things into practice and used Chrome DevTools to build a flexible selector for scraping the names of products on eBay.
Thanks for reading this article! :)
What challenges have you faced when trying to find good CSS selectors? Let me know in the comments.